How to Build a Video Timeline in React
A practical guide to building a React video timeline with tracks, drag and resize, playhead sync, frame-based timing, virtualization, and the fastest path if you do not want to build every timeline behavior from scratch.
Sam
Creator of RVE
If you want to build a video timeline in React, the short answer is: treat the timeline as a frame-based editing system, not just a draggable list.
A real video timeline needs at least five things working together:
- tracks for layered items
- frame-based timing for accurate edits
- drag, resize, and snapping interactions
- playhead sync with the preview player
- a durable project model that preview and export both understand
That is why teams often search for a “React video timeline component” and then realize they actually need part of a whole editor architecture.
If you want the wider systems view, start with How to Build a Video Editor in React, Web-Based Video Editor Architecture, and How to Add Captions to a React Video Editor. This guide focuses specifically on the timeline layer.
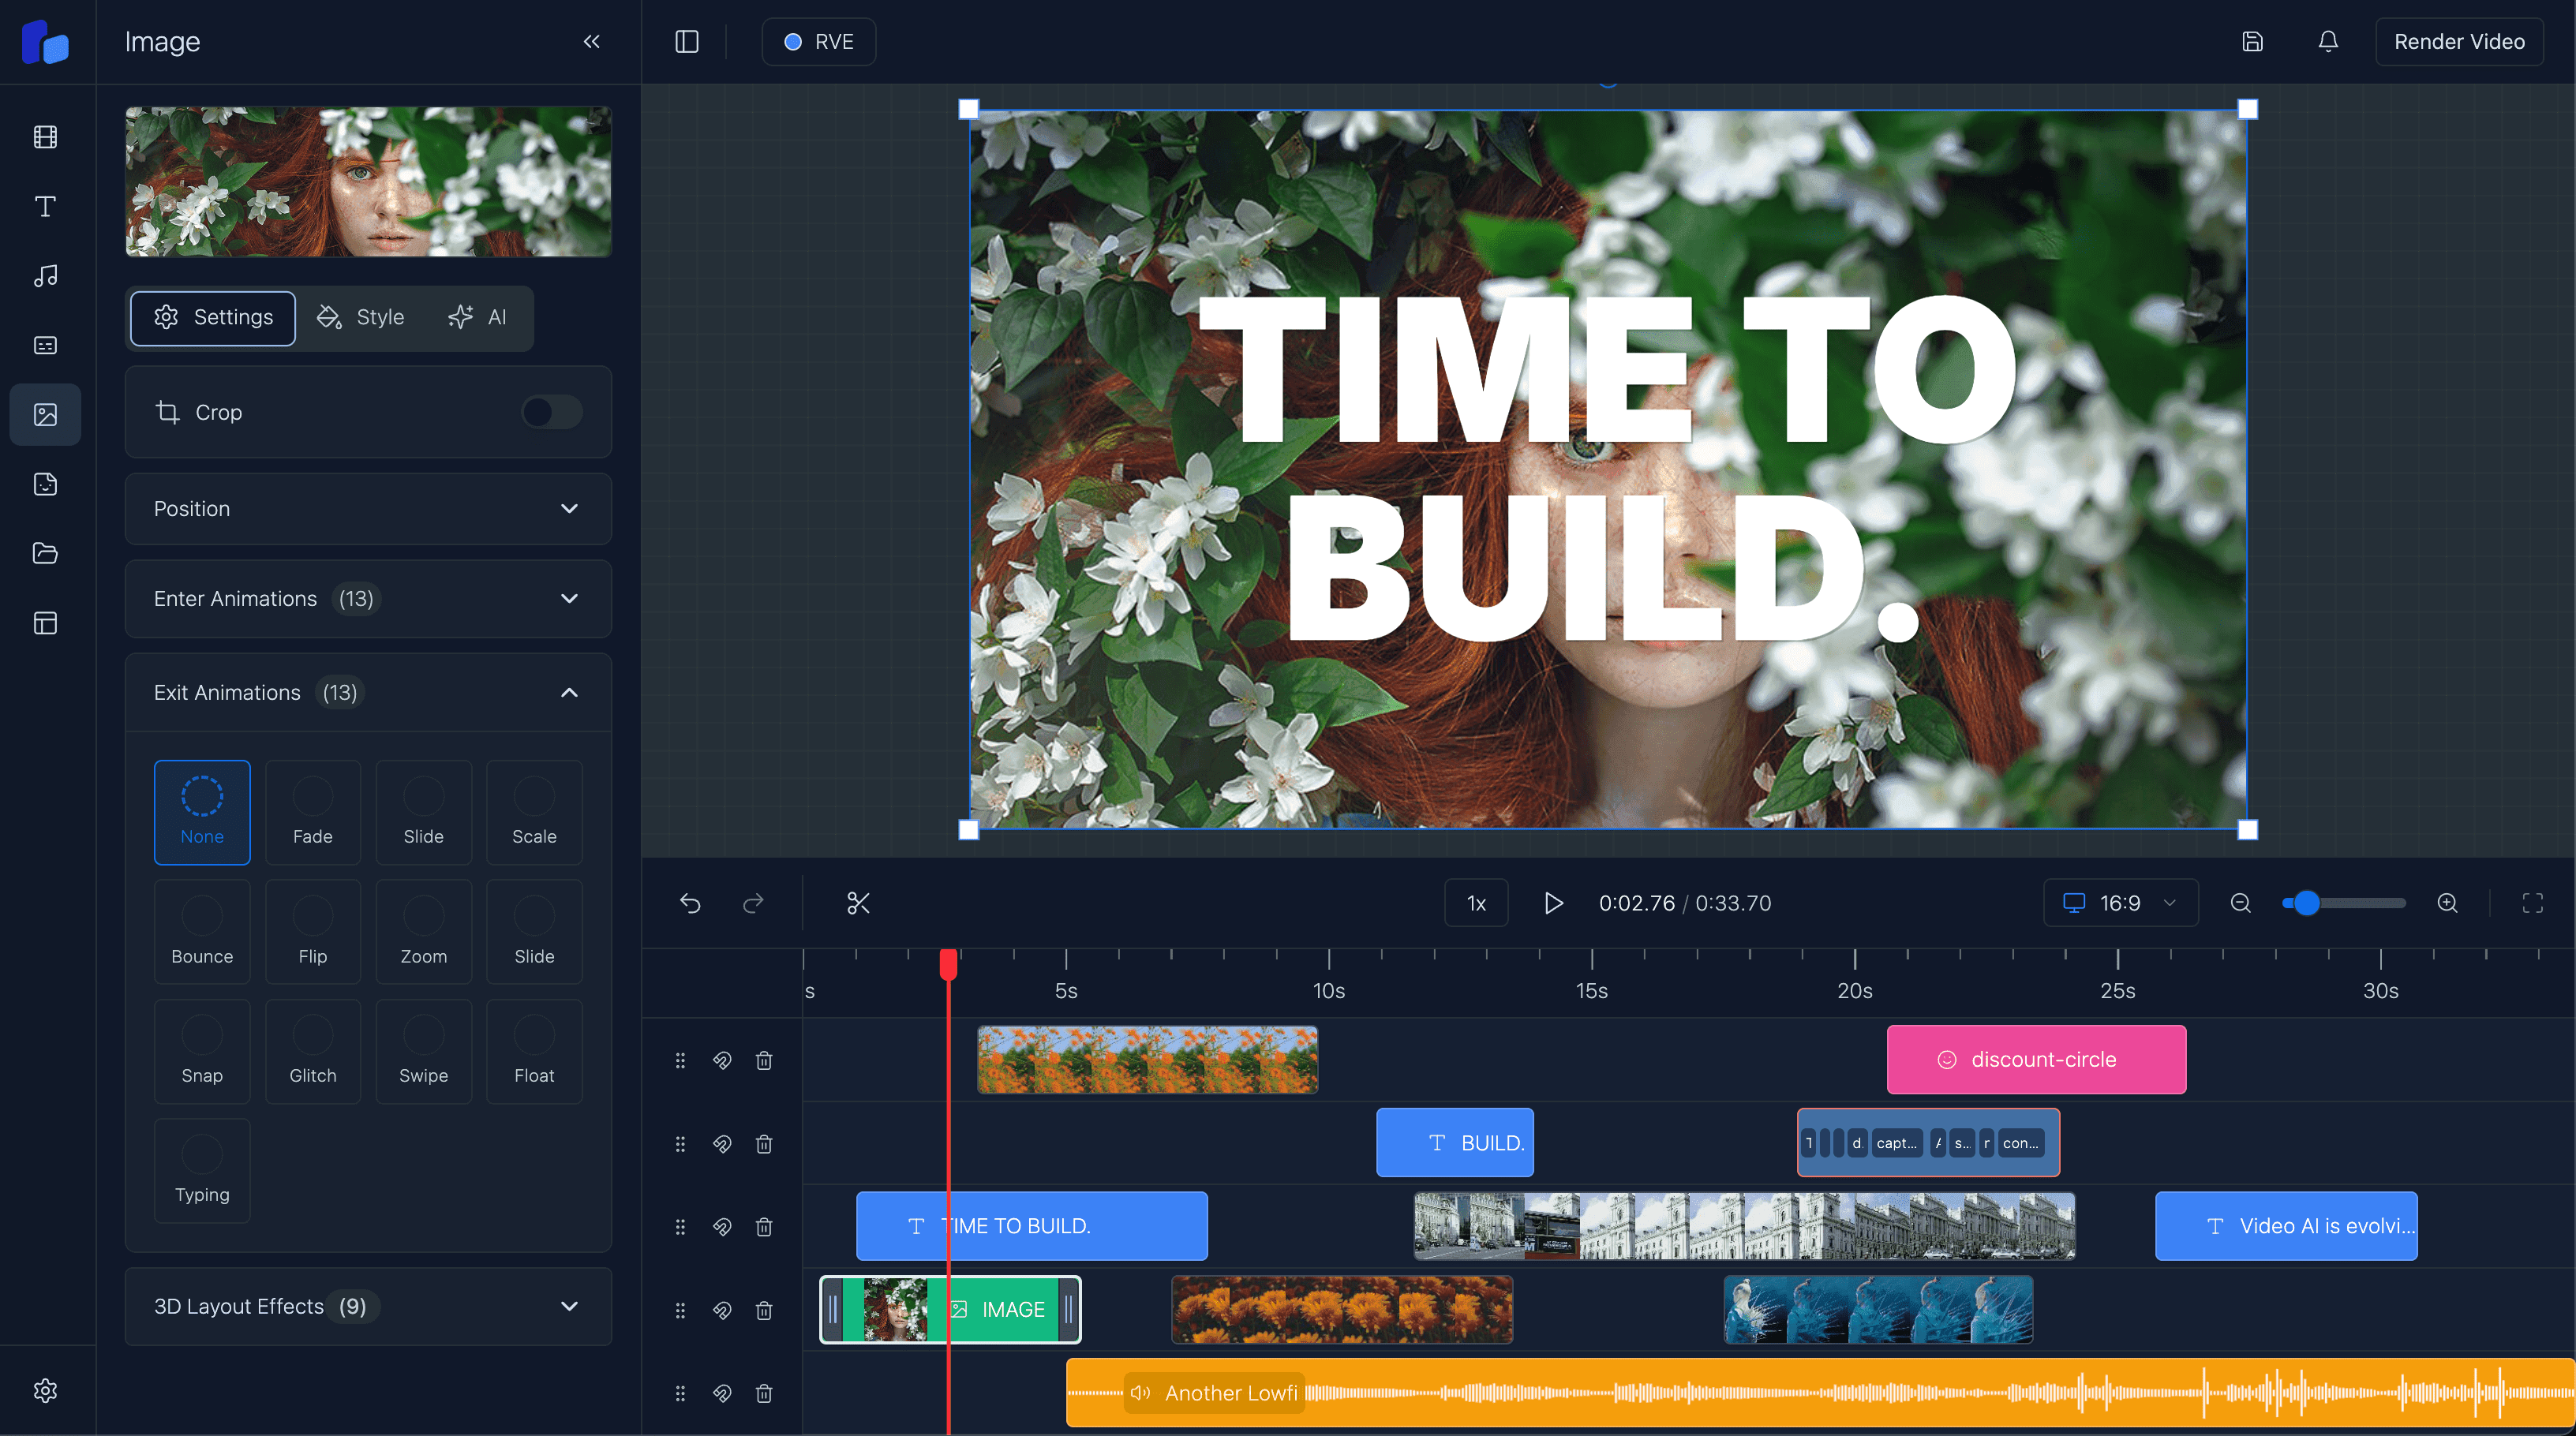
What a React video timeline actually does
A timeline is the editing surface that lets users control what appears when.
In a browser-based editor, that usually means the timeline is responsible for:
- placing clips on tracks
- trimming start and end points
- splitting items
- moving items in time
- changing track order
- snapping edits to nearby boundaries
- scrubbing with a playhead
- showing selections and hover states
- keeping UI state aligned with preview playback
If your timeline is weak, the whole editor feels unreliable no matter how good the export pipeline is.
The best internal model: frames first
For video products, I strongly prefer frames as the canonical timing unit.
You can still display seconds in the UI, but internally a timeline gets much easier to reason about when every item is stored with from and to frame values.
A simple model looks like this:
export type TimelineItem = {
  id: string;
  trackId: string;
  type: "video" | "image" | "text" | "audio" | "caption";
  from: number;
  to: number;
  trimStart?: number;
  trimEnd?: number;
  label?: string;
  source?: {
    src: string;
    assetId?: string;
  };
  style?: Record<string, unknown>;
  content?: Record<string, unknown>;
};

export type TimelineTrack = {
  id: string;
  name: string;
  items: TimelineItem[];
};

export type TimelineState = {
  fps: number;
  durationInFrames: number;
  currentFrame: number;
  zoom: number;
  selectedItemId: string | null;
  tracks: TimelineTrack[];
};
That gives you one stable source of truth for:
- drawing item positions
- calculating drag offsets
- resizing clips
- snapping logic
- synchronizing the playhead
- rendering the same project in preview and export
How to map frames to pixels
Most timeline UI logic comes down to one relationship:
const pixelsPerFrame = zoom;
const x = item.from * pixelsPerFrame;
const width = (item.to - item.from) * pixelsPerFrame;
Once you have that mapping, the timeline becomes mostly a conversion problem:
- drag on the x-axis -> convert pixels back into frame movement
- resize handle movement -> convert pixels into new
fromorto - playhead position -> convert current frame into an x value
- zooming -> change pixels-per-frame without changing project timing
A lot of timeline bugs come from mixing this layer with seconds, percentages, or CSS-only assumptions.
Core interactions you need
1. Drag to move items
When a user drags a clip, you usually want to:
- keep track of the initial frame position
- convert pointer delta into frame delta
- update
fromandtotogether - optionally move across tracks
- prevent overlaps if your editor does not allow them
A common pattern is to keep preview state local during drag, then commit the final frame positions on pointer release.
2. Resize start and end
Resizing is where frame math matters most.
You need to support:
- trimming the left edge without crossing the right edge
- trimming the right edge without crossing the left edge
- preserving minimum clip duration
- reflecting trim state in preview and export
That usually means resizing should update timeline timing and source trim metadata when relevant.
3. Snapping
Snapping makes the timeline feel professional.
Useful snap targets include:
- playhead position
- adjacent clip start/end
- zero frame
- scene boundaries
- markers or guides
Without snapping, the editor feels sloppy. With too much snapping, it feels sticky. The right balance is subtle but important.
4. Scrubbing and playhead sync
The playhead should be the same timeline position used by your preview player.
That means if the playhead says frame 240, the preview should also be showing frame 240.
If those drift apart, users immediately lose trust in the editor.
This is one reason I like pairing React timeline state with Remotion for composition and rendering. The frame-based model fits naturally.
Recommended component structure
A React video timeline is usually easier to maintain when you split it into focused pieces:
TimelineShell– scroll container, zoom, and global event wiringTimelineHeader– ruler, markers, and playhead labelTimelineTrackList– rows of tracksTimelineTrackRow– one track laneTimelineItemBlock– one clip or overlay itemPlayhead– current frame indicatorSelectionLayer– selection box, guides, snap hints
That separation helps a lot once the timeline grows beyond a prototype.
Performance matters earlier than you think
Even a decent-looking timeline can become slow once you have:
- many tracks
- many clips per track
- zoomed-out projects with long durations
- heavy rerenders during drag
Three fixes matter early:
Virtualize rows and visible regions
Only render the tracks and items the user can actually see.
Keep drag state lightweight
Do not recompute the whole editor tree on every pointer move if you can avoid it.
Memoize layout calculations
Timeline position math is cheap once, but expensive when repeated for every item every frame.
The mistake most teams make
The most common mistake is treating the timeline as a standalone UI widget.
It is not just UI.
It is the point where these systems meet:
- project schema
- playback state
- selection state
- keyboard shortcuts
- undo/redo
- preview rendering
- export rendering
That is why timeline work expands so quickly once you build beyond the demo stage.
Build from scratch vs start with React Video Editor
You should build the timeline yourself if:
- timeline behavior is your core product moat
- you need very custom editing rules
- your team wants full ownership of the interaction model
You should start from React Video Editor if:
- you want a production-oriented React timeline faster
- your real product value is above the timeline layer
- you need timeline, overlays, captions, and rendering to work together now
If you want to see the product surface this connects to, look at the React Video Timeline feature page and the timeline docs.
Practical build order
If I were building a React timeline today, I would do it in this order:
- define a frame-based item schema
- render static tracks and items
- add playhead + preview synchronization
- add drag to move
- add left/right resize
- add snapping
- add keyboard shortcuts and selection polish
- add virtualization and scale optimizations
That order gets you to a usable editor faster than trying to solve every interaction edge case on day one.
FAQ
What is the best way to build a React video timeline?
Use a frame-based project model, map frames to pixels, keep the playhead synchronized with preview, and separate timeline interaction state from durable project state.
Is there a React video timeline component I can use instead of building one from scratch?
Yes. If you do not want to build the timeline system yourself, React Video Editor gives you a production-focused starting point for timeline-driven editing.
Should a video timeline use seconds or frames internally?
For most serious editors, frames are the better internal unit. You can still show seconds in the UI.
What is the hardest part of a React video timeline?
Usually synchronized drag/resize behavior, snapping, and keeping preview, timeline, and export logic consistent.
Final thought
A React video timeline is not valuable because it looks like an editor.
It is valuable when users can trust that moving an item on the timeline changes the preview and the final render in the exact same way.
That is the standard to build toward.
If you want to skip rebuilding that foundation from zero, React Video Editor exists for exactly that reason.